
Step-by-Step Guide: How to Dig a Ditch with a Mini Excavator
Digging ditches for residential landscaping projects, drainage systems, or utility line installation typically requires hours of exhausting manual labor with […]
Digging ditches for residential landscaping projects, drainage systems, or utility line installation typically requires hours of exhausting manual labor with a shovel. However, utilizing a mini excavator can transform this grueling chore into swift precision work.
Transform tedious ditch digging into efficient, precise work with a mini excavator, ideal for residential landscaping and utility installations. This detailed guide explains key specifics on effectively leveraging mini excavators to carve ditches precisely, safely, and rapidly even in confined home spaces. Keep reading to learn about How to Dig a Ditch with a Mini Excavator
Key Takeaways
1. Efficiency: Mini excavators transform labor-intensive ditch digging into precise, swift work.
2. Versatility: Ideal for residential landscaping, drainage, and utility line installation.
3. Safety: Essential steps include contacting local utilities and thorough equipment inspection.
4. Technique: Proper positioning, controlled movements, and maintaining uniform trench dimensions are crucial.
5. Maintenance: Routine checks and servicing ensure optimal performance and longevity.
What is a Mini Excavator and Why Use One for Ditch Digging?
A mini excavator, sometimes called a compact excavator, is essentially a smaller, more maneuverable version of a full-sized excavator. Weighing under 8 tons with a more limited digging depth capacity, mini excavators excel at residential-scale trench digging.
Key Features and Benefits
Sturdy tracks allow mini excavators to handle soft, uneven terrain. The adjustable boom and arm with hydraulic power deftly swing a bucket attachment to scoop and move earth. This equipment can trench through dense clay and rocky soils with much more ease than manual shovel work.
An enclosed weatherproof cab with ergonomic controls gives the operator precision command of all the machine’s movements. High visibility windows enhance sight lines to the work area.
Ideal for Small Spaces
Given their petite frames and short rear swing radii, mini excavators fit into backyard spaces too tight for larger excavators. Their compact size coupled with pivot steering capacities allows them to dig trenches in close quarters between trees, fences, and structures where full-sized models simply can’t maneuver.
No more struggling with awkward, cramped shovel work! A mini excavator reaches precisely where needed, even long narrow trenches while occupying minimal footprint space.
Critical Safety and Inspection Steps Before Digging

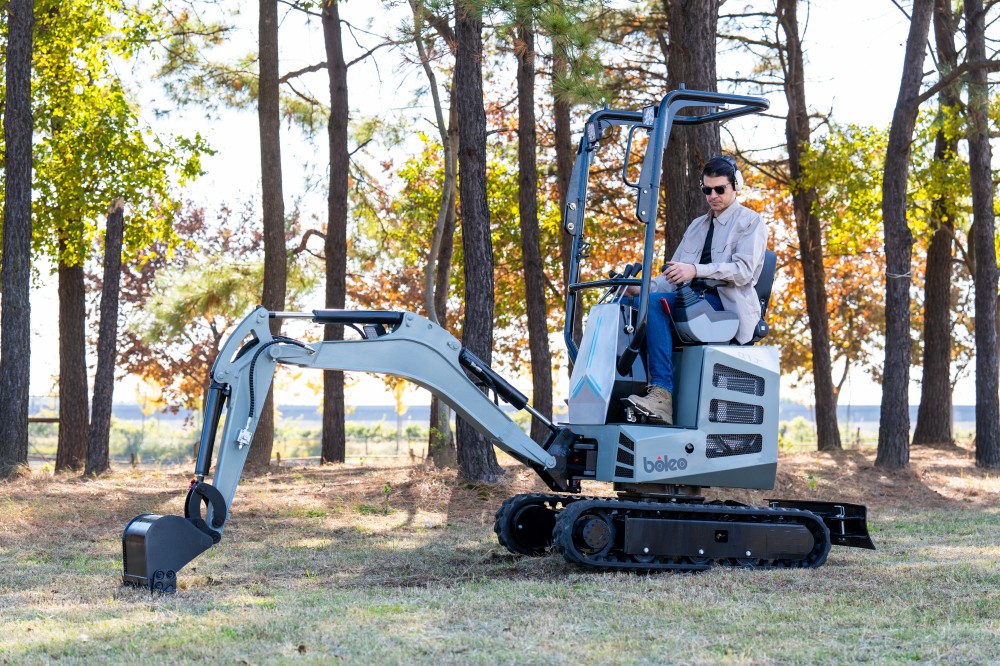
The picture above shows a 1-2 ton mini excavator manufactured by Boleo.
When operating heavy power equipment like excavators, job site safety and responsibility should be top priorities:
Contact Local Utilities for Buried Line Marking
Accidentally striking underground gas pipes, electrical lines, or other infrastructure can cause severe hazards and will incur major fines. So the very first step is calling 811 to request line marking at your dig site several days before excavating.
Conduct a Thorough Excavator Inspection
Inspect all fluid levels, hydraulic hoses/lines, control linkage, lights, and other key components. Catch any issues beforehand rather than mid-trench.
Wear Protective Equipment
Don steel-toed boots, sturdy gloves, eye shields and ear protection at a minimum when running an excavator. Also use a hard hat and high visibility vest near traffic areas.
Ensure a Stable Platform
The excavator should sit level on solid, flat ground with even weight distribution. Position away from slopes and suspended loads that may shift suddenly.
How to Position the Mini Excavator for Optimal Ditch Digging
Proper positioning is crucial for stability, efficient range of motion, and achieving straight evenly graded trenches.
Park Centered Directly Over the Planned Ditch Line
Place the excavator aligned squarely above the marked ditch path, not offset to one side. Position controls to face the trenching direction.
Use Tracks to Outline Ditch Course
Notice how tracks imprint guideline paths visible in soil or turf? Use this effect to lay out the basic ditch direction. Keep tracks/treads parallel to eventual slope lines.
Set Arm and Bucket Angle Within Optimal Operating Range
Maintain arm & stick angle between 35-45 degrees off vertical – the peak leverage zone for powerful, efficient scooping. Tilt the bucket accordingly.
Preserve Excavator Stability
Avoid long off-center reaches which can destabilize the equipment. Dig from the stable supportive diagonal zones of the track’s footprint.
Step-by-Step Process for Carving Straight Ditches

With controls mastered and the excavator aligned, it’s gone time! Follow these methods:
Visibly Mark Ditch Position First
Use neon marking paint or stakes with string to outline the exact trench location on the ground. Center tracks directly over this path.
Strip Away the Top Layer Carefully
Remove existing topsoil and sod first, segregating it so that it stays workable for later finish grading.
Excavate to Total Depth Before Widening
Dig down to full depth in one section first before moving laterally to grade sidewalls or expand width. Repeat small segments until the bottom grade is achieved across the entire planned line.
Use Precise Control Inputs
Coordinate stick and bucket motions to keep the bucket’s bottom edge vertical as it swings through the soil for flat sidewalls and bases.
Maintain Consistent 45 Degree Slope Angles
Shape walls at even 45-degree angles by working bottom up rather than just sideways. This prevents sloppy slumping trenches in uneven “V” shapes.
Remove Cave-in Materials Promptly
Use the bucket to frequently clear off loose debris, rocks or soil chunks that slough into the trench, compromising walls.
Adding Finishing Touches for Durable High-Quality Ditches
After digging the basic trench, several final steps ensure lasting infrastructure:
Smooth and Level Trench Bottom
Use the excavator bucket to gently “throw and smooth” the base til uniform, promoting proper drainage.
Install Shoring Elements If Necessary
In deep trenches or unstable soils, brace walls with plywood sheets, trench boxes, metal shoring, or recessed steps.
Add Piping or Wiring Elements Now If Required
If utilities are involved, lay and connect them precisely following code specs before backfilling over.
Carefully Backfill the Trench in Layers
Finally replace excavated material in thin 8-10” layers, tamping for compaction between each pour.
Common Errors to Avoid During Trench Excavations
While digging trenches, steering clear of just these three easily avoided mistakes enhances site safety and quality results:
Forgetting to Contact Local Utilities for Buried Line Marking
Accidentally striking unsafe dirt-covered cables or pipes brings major risks. Always call 811 first!
Haphazard Unplanned Digging Lacking Strategy
Careful plotting of trench positioning, depths and slopes prevents subpar sluggish work requiring re-dos. Measure meticulously first.
Disregarding Signals of Unstable Soils
Crumbling, cracking, and eroding soil indicates walls will easily collapse. Reinforce with immediate shoring supports.
Routine Mini Excavator Maintenance For Optimal Performance
Follow the manufacturer’s manual for timely service of fluids, filters, lubricants, tracks, and other upkeep. Proper mini excavator care prevents issues for years of quality ditch digging.
Conclusion
In summary, mini excavators are ideal power equipment choices for residential-scale trench digging, eliminating backbreaking manual shovel work. By following safe operating procedures and techniques outlined here for controlled precise trench carving, homeowners can neatly complete ditch projects even in confined home spaces.
FAQs
1. What safety gear should I wear when operating a mini excavator to dig ditches?
You should wear steel-toed boots, thick gloves, eye protection, and ear protection at minimum when operating a mini excavator. Also use a hard hat and high-visibility vest when working near traffic areas.
2. How do I ensure the mini excavator is stable when trenching?
Park the mini excavator on firm, level ground with weight evenly distributed across the tracks. Face the excavator squarely aligned over the planned ditch to allow optimal movement range. Avoid long off-center reaches which can destabilize the machine.
3. What’s the proper technique for carving neat trenches with uniform sidewalls?
Use precise stick and bucket control movements to keep the bucket’s bottom edge vertical as it swings through the soil. This slices flat smooth trench walls. Maintain a consistent 45-degree angle working bottom up rather than just sideways.
4. Why does my trench have uneven sloping walls and bottom?
Uneven “V” shaped trenches with sloping walls happen when digging outside before the bottom depth is reached. Also, not keeping the bucket edge vertical when scooping creates angled choppy walls. Dig the bottom first, then use level bucket motion.
5. How often should I maintain a mini excavator used for home trench digging projects?
Follow the machine manufacturer’s manual for servicing intervals, but a general rule is to check hydraulic fluid levels and lubrication points before each major use session. Change hydraulic filters every 6 months or 200 hours during active digging seasons.
6. How can a mini excavator improve the efficiency of ditch digging?
A mini excavator improves ditch digging efficiency by allowing precise, rapid excavation in confined spaces, reducing manual labor, and providing powerful digging capabilities even through dense or rocky soils.
Related News

How Fast Can a Mini Excavator Dig?
In many construction projects, the challenge of efficiently managing small to medium-sized dig sites often leads to delays and increased […]

Mini Excavator Brush Cutter: Clearing the Path for You
Mini excavators are extremely versatile. Right mini excavator attachments can transform the capabilities of compact excavators and unleash their full […]
What Are Mini Excavators Used For? A Comprehensive Guide
Mini excavators, compact versatile machines, are used across industries for diverse applications. Their small size and maneuverability uniquely equip them […]

Troubleshooting Common Mini Excavator Issues: From Starters to Hydraulics
Mini excavators, also called compact excavators, play a significant role in construction work because they offer great flexibility, easy handling, […]

Mini Excavator Auger: Dig Deeper with This Powerful Attachment
Enhance your mini excavator’s digging power with a mini excavator auger attachment, ideal for precise and efficient excavation in construction, […]
Do you have any questions?
Welcome to boleo. Evolve with the brightest!